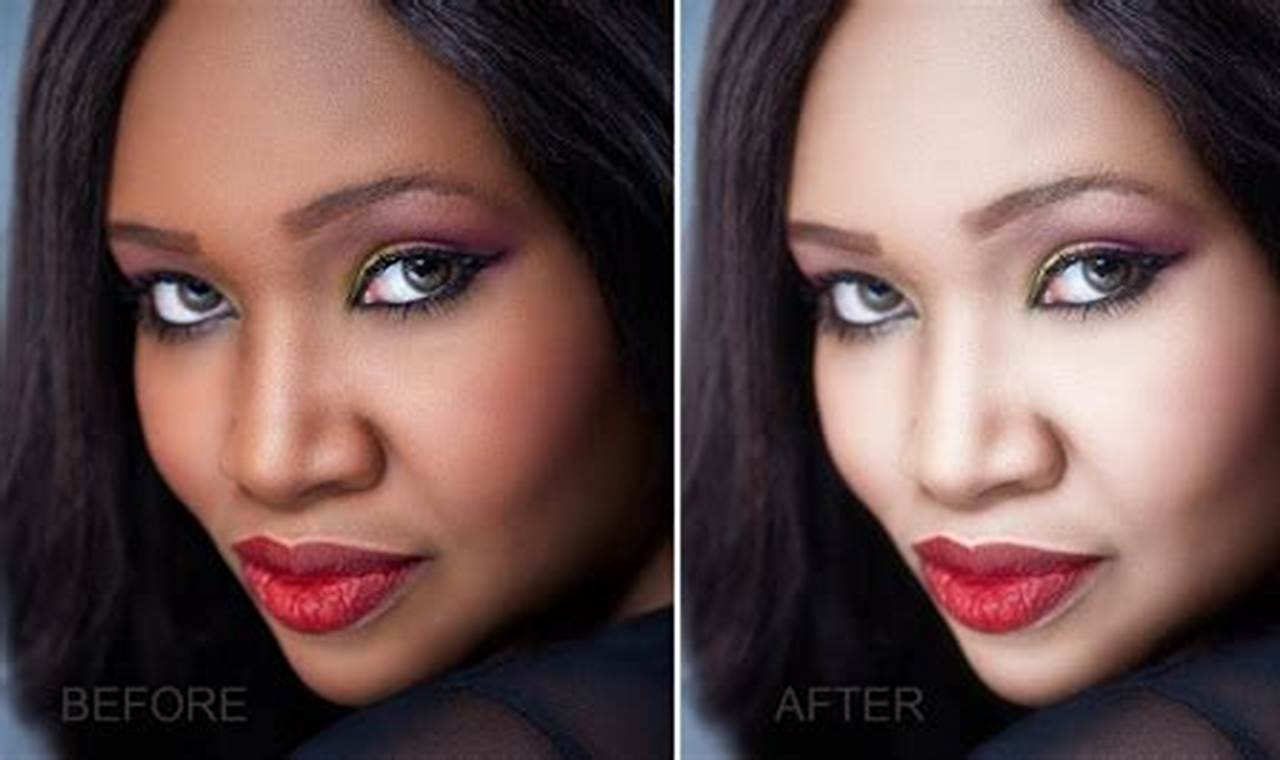
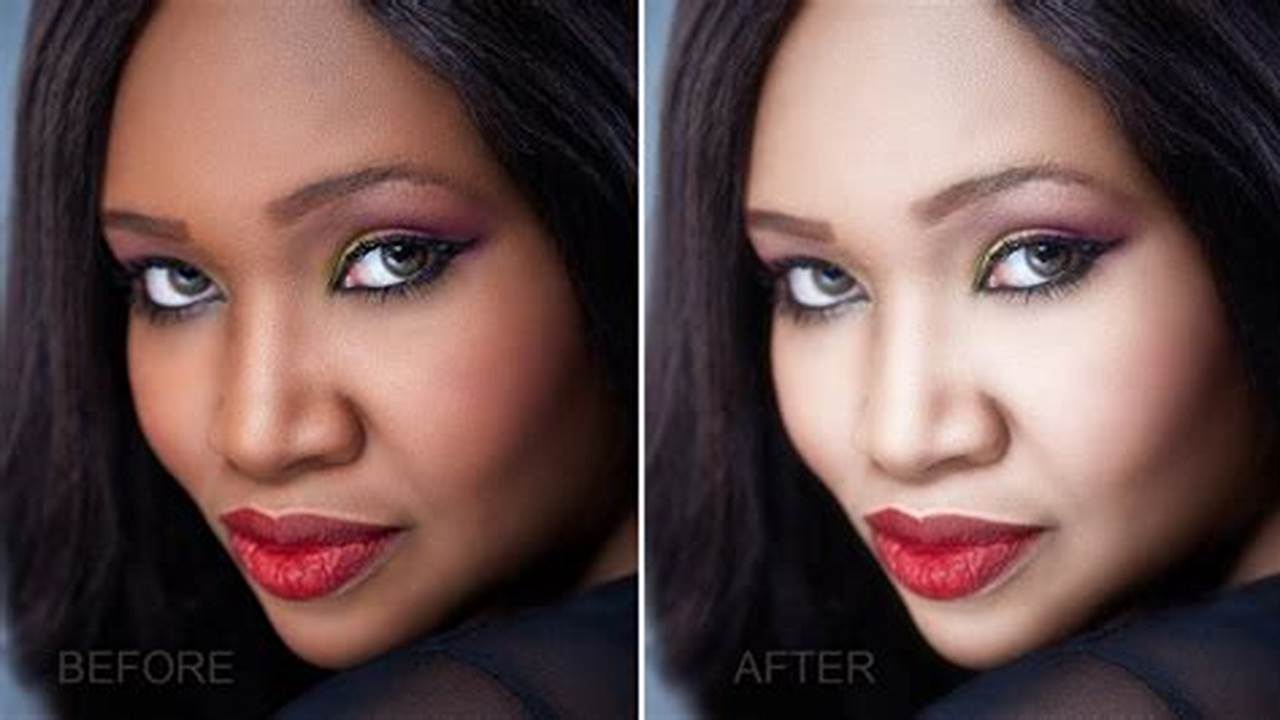
How you can Change White Pores and skin Tone to Black in Photoshop entails adjusting the picture’s shade stability, ranges, and curves to attain a natural-looking consequence. This method is helpful for creating numerous and real looking photos, enhancing the illustration of various pores and skin tones in digital media.
Altering pores and skin tone in Photoshop gives a number of advantages. It permits artists to right shade casts, alter the lighting, and match the pores and skin tone to the general shade scheme of the picture. Moreover, it allows the creation of numerous and inclusive imagery, fostering a extra consultant and correct portrayal of people from numerous backgrounds.
To successfully change white pores and skin tone to black in Photoshop, observe these steps:
- Open the picture in Photoshop and duplicate the background layer.
- Regulate the colour stability by growing the cyan and magenta values within the shadows and reducing them within the highlights.
- Regulate the degrees to extend the distinction and produce out the main points within the pores and skin.
- Regulate the curves to additional refine the pores and skin tone and create a easy transition between the completely different tones.
- Use the dodge and burn instruments so as to add highlights and shadows to the pores and skin, enhancing its depth and realism.
By following these steps, you possibly can successfully change the pores and skin tone in Photoshop, permitting for better management over the picture’s general look and selling inclusivity in digital artwork.
1. Colour Stability
Within the context of fixing white pores and skin tone to black in Photoshop, adjusting the colour stability is essential for correcting undesirable shade casts that will have an effect on the pores and skin’s pure look. Colour casts can come up as a consequence of numerous components, akin to lighting situations throughout images or the colour temperature of the machine used for modifying.
-
Aspect 1: Understanding Colour Casts
Colour casts are sometimes brought on by an imbalance within the main colours (pink, inexperienced, and blue) that make up a picture. When these colours should not in concord, they will create an unnatural tint or hue over your entire picture, together with the pores and skin tones.
-
Aspect 2: Adjusting Cyan and Magenta Values
To right shade casts in Photoshop, significantly when altering white pores and skin tone to black, adjusting the cyan and magenta values within the shade stability settings is important. By growing or reducing these values, you possibly can neutralize undesirable shade tints and produce the pores and skin tone nearer to its pure shade.
-
Aspect 3: Balancing Heat and Cool Tones
Adjusting the cyan and magenta values additionally entails balancing heat and funky tones within the picture. Cyan provides coolness to the picture, whereas magenta provides heat. By rigorously adjusting these values, you possibly can obtain a natural-looking pores and skin tone that’s neither too heat nor too cool.
-
Aspect 4: Enhancing Realism and Depth
Correcting shade casts and adjusting the cyan and magenta values not solely improves the accuracy of the pores and skin tone but additionally enhances the general realism and depth of the picture. By eliminating undesirable shade tints, you permit the pure pores and skin texture and particulars to change into extra outstanding, leading to a extra lifelike and visually interesting consequence.
In abstract, understanding and adjusting the colour stability, significantly the cyan and magenta values, is a elementary step in successfully altering white pores and skin tone to black in Photoshop. It permits you to right shade casts, stability heat and funky tones, and improve the realism and depth of the picture, in the end resulting in a extra pure and correct illustration of pores and skin tones.
2. Ranges
Adjusting the degrees in Photoshop performs an important position in altering white pores and skin tone to black successfully. By manipulating the enter and output ranges, you possibly can improve the distinction and produce out the main points within the pores and skin, leading to a extra pure and real looking look.
-
Aspect 1: Understanding Ranges
Ranges discuss with the vary of brightness values in a picture, from pure black to pure white. Adjusting the degrees permits you to management the distribution of those values, affecting the general distinction and tonal vary of the picture.
-
Aspect 2: Growing Distinction
To boost the pores and skin particulars, it’s usually crucial to extend the distinction of the picture. This may be achieved by adjusting the black and white factors within the ranges panel. By shifting the black level to the suitable and the white level to the left, you slender the vary of tones, making the darkish areas darker and the sunshine areas lighter, leading to a extra outlined and visually interesting picture.
-
Aspect 3: Preserving Pores and skin Texture
Whereas growing distinction is vital, it’s essential to keep away from overdoing it, as this will result in a lack of pores and skin texture and element. By rigorously adjusting the mid-tones, you possibly can protect the refined variations within the pores and skin’s floor, making certain a pure and balanced look.
-
Aspect 4: Enhancing Realism
Correctly adjusting the degrees not solely improves the distinction and particulars of the pores and skin but additionally contributes to the general realism of the picture. By bringing out the pure contours and textures of the pores and skin, you create a extra lifelike and plausible illustration, including depth and dimension to the topic.
In abstract, adjusting the degrees in Photoshop is a strong approach for enhancing the distinction and particulars of the pores and skin when altering white pores and skin tone to black. By understanding the idea of ranges and punctiliously manipulating the enter and output values, you possibly can obtain a pure and real looking pores and skin tone that captures the refined nuances and textures, leading to a visually interesting and genuine picture.
3. Curves
Within the context of fixing white pores and skin tone to black in Photoshop, adjusting the curves is a vital step for refining the pores and skin tone and creating easy transitions between completely different tones. The curves software permits exact management over the tonal vary of the picture, enabling you to boost the pores and skin’s pure contours and obtain a practical and visually interesting consequence.
The curves software works by manipulating the enter and output values of the picture’s tonal vary. By creating adjustment factors on the curve and adjusting their place, you possibly can selectively lighten or darken particular areas of the pores and skin, improve distinction, and refine the general tone. This degree of management is especially helpful for creating easy transitions between completely different pores and skin tones, avoiding abrupt modifications that may seem unnatural.
Moreover, adjusting the curves permits you to tackle particular pores and skin issues, akin to uneven pores and skin tone or shade casts. By rigorously manipulating the curve, you possibly can cut back the looks of blemishes, effective traces, and different imperfections, leading to a extra polished and refined pores and skin tone.
In abstract, the curves software in Photoshop is a strong software for refining pores and skin tone and creating easy transitions when altering white pores and skin tone to black. By understanding the rules of curves adjustment and making use of them skillfully, you possibly can obtain natural-looking pores and skin tones with enhanced depth, realism, and visible attraction.
4. Dodge and Burn
Within the context of “How you can Change White Pores and skin Tone to Black in Photoshop,” the dodge and burn instruments play an important position in including highlights and shadows to the pores and skin, enhancing its depth and realism. By selectively lightening and darkening particular areas, you possibly can create the phantasm of three-dimensionality and produce out the pure contours of the pores and skin.
-
Aspect 1: Enhancing Pores and skin Texture
The dodge software can be utilized to lighten areas of the pores and skin, such because the cheekbones, brow, and nostril bridge, creating the looks of highlights. This helps outline the pores and skin’s construction and provides a pure glow, making it look extra vibrant and lifelike.
-
Aspect 2: Including Depth and Dimension
Conversely, the burn software can be utilized to darken areas of the pores and skin, such because the underneath eye space, jawline, and creases across the nostril. This creates shadows that add depth and dimension to the pores and skin, making it seem extra and visually attention-grabbing.
-
Aspect 3: Refining Pores and skin Tone
The dodge and burn instruments can be used to refine the pores and skin tone and proper any unevenness or discoloration. By selectively adjusting the brightness and darkness of various areas, you possibly can obtain a extra even and natural-looking pores and skin tone, decreasing the looks of blemishes or imperfections.
-
Aspect 4: Making a Pure Look
When utilizing the dodge and burn instruments, it is very important keep away from overdoing it, as this will result in an unnatural or synthetic look. The secret’s to make refined changes that improve the pores and skin’s pure options with out making them look exaggerated.
In abstract, the dodge and burn instruments are important for including highlights and shadows to the pores and skin in Photoshop, giving it depth, realism, and a pure look. By rigorously adjusting the brightness and darkness of particular areas, you possibly can create a pores and skin tone that’s each visually interesting and true to life.
5. Inclusivity
Within the realm of digital artwork, inclusivity performs a pivotal position in selling numerous illustration and difficult slender magnificence requirements. The flexibility to alter white pores and skin tone to black in Photoshop just isn’t merely a technical talent but additionally a software for fostering inclusivity in visible storytelling.
-
Aspect 1: Reflecting the Variety of Society
Digital artwork has the ability to replicate the variety of society, showcasing people from all backgrounds and pores and skin tones. By altering pores and skin tones, artists can create photos that symbolize the total spectrum of human experiences and identities, fostering a extra inclusive and consultant visible panorama.
-
Aspect 2: Difficult Stereotypes and Biases
Altering pores and skin tones in Photoshop challenges stereotypical portrayals of magnificence and race which have traditionally marginalized sure teams. By presenting numerous pores and skin tones as equally stunning and worthy of illustration, artists can dismantle dangerous stereotypes and biases.
-
Aspect 3: Increasing Artistic Potentialities
The flexibility to alter pores and skin tones expands the inventive prospects for digital artists. It permits them to discover completely different cultural aesthetics, create characters from numerous backgrounds, and inform tales that resonate with a wider viewers.
-
Aspect 4: Selling Empathy and Understanding
Inclusive digital artwork can foster empathy and understanding amongst viewers. By seeing themselves represented in artwork, people from underrepresented teams really feel valued and linked, whereas these from dominant teams acquire a deeper understanding of the experiences and views of others.
In conclusion, the connection between inclusivity and the flexibility to alter white pores and skin tone to black in Photoshop is profound. It empowers artists to create numerous and consultant imagery that challenges stereotypes, promotes empathy, and in the end contributes to a extra inclusive and equitable society.
FAQs on Altering White Pores and skin Tone to Black in Photoshop
This part addresses regularly requested questions and misconceptions relating to the method of fixing white pores and skin tone to black in Photoshop.
Query 1: Is it attainable to attain a natural-looking consequence when altering pores and skin tones in Photoshop?
Reply: Sure, with cautious changes to paint stability, ranges, curves, and the usage of dodge and burn instruments, it’s attainable to attain a practical and natural-looking change in pores and skin tone.
Query 2: How can I keep away from making a flat or unnatural look when altering pores and skin tones?
Reply: To forestall a flat or unnatural look, make refined and gradual changes to the pores and skin tone. Keep away from excessive modifications or extreme use of instruments, and take note of the general concord and stability of the picture.
Query 3: What are the important thing concerns when altering pores and skin tones for
Reply: When altering pores and skin tones forconsider components such because the lighting situations, the ethnicity and background of the topic, and the general temper and elegance of the picture.
Query 4: Are there any particular instruments or methods which are significantly efficient for altering pores and skin tones?
Reply: The mixture of shade stability, ranges, curves, and dodge and burn instruments gives a complete method to altering pores and skin tones successfully. Moreover, utilizing adjustment layers and masks permits for non-destructive modifying and exact management over the modifications.
Query 5: How can I make sure that the modified pores and skin tone is per the remainder of the picture?
Reply: To take care of consistency, take into account the general shade scheme and lighting of the picture. Regulate the pores and skin tone in relation to the encircling components, and use instruments such because the eyedropper or shade picker to pattern colours from the picture for a cohesive look.
Query 6: What are the moral concerns when altering pores and skin tones in Photoshop?
Reply: When altering pores and skin tones, it is very important method the method with sensitivity and respect. Keep away from perpetuating stereotypes or selling dangerous magnificence requirements. Use your expertise to advertise range, inclusivity, and correct illustration.
In abstract, altering white pores and skin tone to black in Photoshop entails cautious consideration of shade stability, ranges, curves, and the usage of dodge and burn instruments. By understanding the rules and methods concerned, you possibly can obtain natural-looking and moral outcomes that improve the variety and inclusivity of your digital artwork.
Transition to the subsequent article part: Exploring Superior Methods for Sensible Pores and skin Tone Changes
Suggestions for Altering White Pores and skin Tone to Black in Photoshop
To realize real looking and efficient pores and skin tone modifications, take into account the next suggestions:
Tip 1: Make the most of Colour Stability for Correct Hues
Adjusting the colour stability permits you to right undesirable shade casts and improve the accuracy of the pores and skin tone. By manipulating the cyan and magenta values, you possibly can neutralize unnatural tints and obtain a extra pure look.
Tip 2: Improve Distinction with Ranges Changes
Adjusting the degrees is essential for enhancing the distinction and bringing out the main points within the pores and skin. By manipulating the black and white factors, you possibly can management the tonal vary and create a extra outlined and visually interesting pores and skin texture.
Tip 3: Refine Tones with Curves Changes
The curves software gives exact management over the tonal vary, enabling you to refine the pores and skin tone and create easy transitions. By creating adjustment factors and adjusting their place, you possibly can selectively lighten or darken particular areas, including depth and realism to the pores and skin.
Tip 4: Add Depth with Dodge and Burn Instruments
The dodge and burn instruments permit you to add highlights and shadows, enhancing the pores and skin’s depth and three-dimensionality. By selectively lightening and darkening particular areas, you possibly can create the phantasm of pure contours and produce out the pores and skin’s pure options.
Tip 5: Promote Inclusivity with Various Pores and skin Tones
Altering pores and skin tones in Photoshop extends past technical proficiency; it performs an important position in selling inclusivity. By representing numerous pores and skin tones and difficult slender magnificence requirements, you possibly can contribute to a extra consultant and equitable visible panorama.
Tip 6: Contemplate the Lighting and Background
When altering pores and skin tones, it’s important to think about the lighting and background of the picture. The pores and skin tone ought to harmonize with the general shade scheme and lighting situations to take care of a cohesive and real looking look.
Tip 7: Use Adjustment Layers for Non-Damaging Modifying
Using adjustment layers permits for non-destructive modifying, offering flexibility and the flexibility to make modifications with out altering the unique picture. This method ensures that you would be able to experiment and refine the pores and skin tone changes with out compromising the integrity of the picture.
Tip 8: Apply Often to Refine Your Abilities
Altering pores and skin tones successfully requires follow and experimentation. By often working with completely different photos and pores and skin tones, you possibly can develop your expertise, refine your methods, and obtain more and more pure and real looking outcomes.
In conclusion, the following tips present a complete information to altering white pores and skin tone to black in Photoshop. By understanding the rules and methods concerned, you possibly can create real looking and visually interesting pores and skin tones that improve the variety and inclusivity of your digital artwork.
Conclusion
Altering white pores and skin tone to black in Photoshop is a way that requires a mix of technical proficiency and an understanding of the rules of shade concept and picture modifying. By rigorously adjusting the colour stability, ranges, curves, and utilizing the dodge and burn instruments, artists can obtain natural-looking and real looking pores and skin tone modifications.
Past the technical elements, this system holds significance in selling inclusivity and variety in digital artwork. By representing a variety of pores and skin tones, artists can problem slender magnificence requirements and create photos that replicate the richness and variety of human experiences. This not solely contributes to a extra consultant visible panorama but additionally fosters empathy and understanding amongst viewers.
To grasp this system, follow and experimentation are key. By often working with completely different photos and pores and skin tones, artists can refine their expertise and obtain more and more real looking and visually interesting outcomes. As expertise continues to advance and new instruments emerge, the chances for pores and skin tone changes in Photoshop will solely develop, opening up thrilling avenues for creative expression and storytelling.
