
The way to measure for backsplash is essential for a flawless kitchen transform. Getting the measurements proper ensures your backsplash appears nice and matches completely. This information walks you thru each step, from fundamental measurements to dealing with complicated kitchen layouts. We’ll cowl all the things from the instruments it’s essential to the calculations, and even discover completely different design choices.
Understanding the significance of correct measurements is paramount. Incorrect measurements result in wasted supplies, expensive errors, and a irritating undertaking. We’ll deal with widespread pitfalls and supply a step-by-step strategy to keep away from them. This information equips you with the information to confidently sort out any backsplash undertaking.
Understanding Backsplash Measurement Fundamentals
Yo, fam! Measuring for a backsplash ain’t rocket science, however accuracy is essential. A tiny mistake can result in an entire lotta wasted materials and a irritating undertaking. We’re gonna break down the necessities so you’ll be able to nail this half and get that contemporary backsplash lookin’ fly.Correct backsplash measurements are essential for a clean set up. Mistaken measurements imply wasted tile, grout, and your valuable time.
Plus, a exact measurement ensures a professional-looking end, making your kitchen or toilet the envy of all of your homies.
Significance of Correct Measurements
Exact measurements stop expensive errors. Think about shopping for sufficient tile for a ten sq. foot space, solely to search out you want 12 sq. toes. That is further money down the drain. Correct measurements assure you’ve gotten the correct quantity of supplies, minimizing waste and maximizing your finances. Additionally, correct measurements guarantee a seamless match, avoiding gaps or overlaps that may destroy the aesthetic.
Widespread Measurement Errors
Of us usually overlook to account for the countertop edge. This seemingly small element can result in a miscalculated backsplash space. One other widespread error is overlooking the peak of the backsplash, which is essential for the entire space calculation. Additionally, ignoring the thickness of the tile or backsplash materials can have an effect on the ultimate space.
Instruments for Exact Measurements
You may want a number of necessities for correct backsplash measurements. A tape measure is a must have. For bigger areas, a measuring wheel or laser stage could be helpful. A pencil or marker to mark measurements on the wall is a no brainer. A stage helps guarantee straight traces and a sq. to ensure the backsplash is sq. to the wall.
Backsplash Supplies and Measurement
Completely different backsplash supplies require completely different measurement approaches. Ceramic tile, for instance, often is available in commonplace sizes. So, you’ll be able to calculate the realm primarily based on the tile’s dimensions. However for one thing like glass or stone, you may have to think about variations in thickness or irregular shapes.
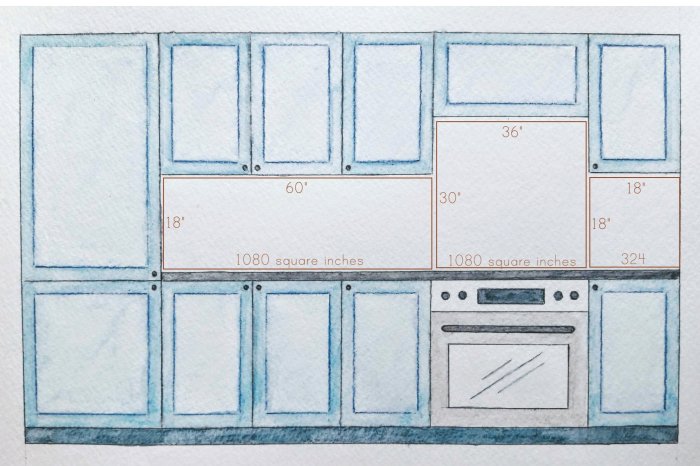
Calculating Whole Backsplash Space
To find out the entire backsplash space, multiply the backsplash’s top by its width. For instance, a backsplash 3 toes tall and 5 toes huge has a complete space of 15 sq. toes. Keep in mind to think about any cuts or irregular shapes. When you have a curved part, break it down into manageable shapes to calculate the realm.
Comparability of Measurement Strategies
| Measurement Technique | Execs | Cons |
|---|---|---|
| Tape Measure | Correct for smaller areas, cheap | Will be cumbersome for giant areas |
| Measuring Wheel | Environment friendly for giant areas, much less time-consuming | Will be much less exact than tape measure |
| Laser Stage | Correct, quick, and straightforward to make use of | Will be costly, may want a helper |
Measuring the Backsplash Space

Yo, homies, gettin’ that backsplash lookin’ contemporary is essential. However earlier than you escape the tile, you gotta know the sq. footage. This ain’t rocket science, just a few straight-up math and a bit measuring tape motion. Let’s get all the way down to brass tacks.Measuring the backsplash space precisely is essential for buying the correct quantity of tile and grout.
A exact measurement prevents expensive errors and ensures a clean, seamless set up. It is all about these numbers, fam!
Completely different Measuring Strategies
Utilizing a measuring tape, ruler, or perhaps a calculator, you’ll be able to nail down these backsplash dimensions. Choose your weapon—all of them work. A measuring tape is your go-to for bigger areas, whereas a ruler is ideal for smaller, detailed sections. A calculator is important for determining the entire space after you have the peak and width. Do not be a dummy; use the appropriate instruments for the job.
Measuring Peak and Width
For a exact backsplash measurement, it’s essential to measure the peak and width of the realm you are working with. Begin on the base of the wall and measure straight as much as the specified high of the backsplash. For the width, measure the space from one fringe of the backsplash to the opposite, all the time retaining the tape measure straight.
Accuracy is your pal right here. Even a tiny error can result in main complications later.
Calculating the Whole Backsplash Space
As soon as you’ve got bought the peak and width, you are able to crunch the numbers. The system for the realm of a rectangle is straightforward: Space = Peak x Width. For instance, in case your backsplash is 3 toes excessive and 5 toes huge, the realm is 15 sq. toes. Use a calculator or do the maths your self—your alternative. Simply be sure that the items (toes, inches, and many others.) match.
Measuring for Completely different Kitchen Layouts
Completely different kitchen layouts require completely different measuring methods. An L-shaped kitchen wants you to measure every part individually, then add the areas collectively. A U-shaped kitchen includes measuring every part of the backsplash, including these up, and bam! You’ve got bought your complete. A galley kitchen may simply want one lengthy measurement, relying on the configuration. Give it some thought, fam.
Break it down and conquer it!
Backsplash Measurement Information by Kitchen Format
| Kitchen Format | Steps |
|---|---|
| L-shaped | Measure every part’s top and width, then add the areas. |
| U-shaped | Measure every part’s top and width, then add the areas. |
| Galley | Measure the general top and width of the backsplash space. |
Ideas for Correct Backsplash Measurements
- Use a dependable measuring tape and double-check your measurements. Errors occur, however you’ll be able to keep away from them by paying consideration.
- Make sure the tape measure is held straight and perpendicular to the wall. A crooked measurement offers you a crooked backsplash.
- Measure a number of instances to verify your accuracy. That is particularly essential for bigger areas.
- Document your measurements fastidiously. Writing them down will provide help to keep away from errors later.
- Think about any obstacles, like home equipment or cupboards, when measuring. Account for these, fam.
Accounting for Cutouts and Irregularities
Yo, homies, measuring a backsplash ain’t all the time a straight shot. Typically, you gotta cope with curves, cutouts, and bizarre angles. This ain’t no fundamental rectangle; we’re talkin’ real-world kitchens. Get able to flex your measuring muscle mass!Understanding the best way to account for these irregularities is essential to getting an ideal backsplash set up. Whether or not it is round a cool oven cutout or a sink’s curved edge, exact measurements are essential for a flawless end.
Skip the complications; let’s break down the methods!
Measuring Round Cutouts and Home equipment
This part particulars the best way to calculate the backsplash space precisely round cutouts, ovens, and different obstacles. These methods guarantee no tile goes to waste and the backsplash matches seamlessly.
To measure round cutouts, you gotta deal with every irregular form as its personal separate space. Utilizing a mix of measuring tape and a pencil or marker is essential. First, Artikel the realm needing backsplash round home equipment, sinks, or any cutout.
- Measure the straight edges across the cutout, noting the precise dimensions. That is essential for calculating the realm of the encircling backsplash.
- If the cutout is an easy form, like a circle or rectangle, calculate its space utilizing the usual formulation for these shapes. Then, subtract this space from the entire space to find out the backsplash space.
- For extra complicated shapes, use a mix of straight-line measurements and a ruler to calculate the realm of every portion. Be tremendous meticulous when calculating the backsplash areas round curved home equipment.
- When coping with curved edges, divide the curve into smaller sections. Measure the straight traces alongside the curve and use formulation for curved shapes (if potential). If it is actually funky, you may want an expert.
Calculating Areas with Curves and Angles
Coping with curves and angles requires further care. You possibly can’t simply use a easy rectangle system.
For curved areas, divide the curve into smaller, manageable sections. Measure the straight traces alongside the curve, after which use a system to approximate the realm. This may contain breaking down the curve right into a sequence of trapezoids or triangles. You may as well use a specialised measuring device for curved surfaces.
Accounting for Equipment Cutouts
When coping with home equipment, your measurements are immediately impacted by the cutout’s form and dimensions. Think about the house wanted across the equipment. Measure fastidiously the house wanted for tiling across the equipment and guarantee it aligns with the specified aesthetic.
- Measure the general space of the cutout.
- Decide the entire backsplash space required across the equipment, bearing in mind the depth and width of the cutout.
- Calculate the backsplash space by subtracting the cutout space from the entire space. All the time think about an additional inch or two for grout traces.
Measuring Irregular Shapes
Calculating areas for irregular shapes wants a mix of methods. The purpose is to interrupt the form into smaller, extra manageable items.
| Form | Measurement Approach |
|---|---|
| Rectangle/Sq. | Size x Width |
| Circle | πr2 |
| Triangle | (1/2) x Base x Peak |
| Complicated Irregular Shapes | Divide into smaller, recognizable shapes (rectangles, triangles, and many others.), and calculate the realm of every. Add up the areas. |
Adjusting for Angled Partitions and Corners
Angled partitions or corners require particular consideration. You possibly can’t simply measure like a traditional wall.
- Measure the size of the angled wall phase that might be lined by the backsplash. Use a measuring tape and guarantee accuracy.
- Account for the angle by utilizing the right system or utilizing a protractor.
- Account for the peak variations of the wall segments. Measure the peak at varied factors alongside the angled wall.
Accounting for Variations in Wall Heights
Completely different wall heights require versatile approaches to measurement.
- Measure the peak of the wall at varied factors alongside the backsplash space.
- Use a stage to make sure correct measurements. Guarantee the peak of the backsplash is uniform.
- Account for any variations in top to make sure a clean and seamless backsplash.
Figuring out Backsplash Materials Necessities
Yo, fam! Determining how a lot backsplash materials you want is essential for a clean set up and to keep away from operating to the shop in a panic. Figuring out the appropriate quantities prevents complications and saves you critical coin. We’re breaking down the maths, from easy tiles to fancy mosaics, so you’ll be able to ace this a part of the undertaking.This part dives into the nitty-gritty of calculating backsplash materials wants.
It covers all the things from fundamental space calculations to accounting for waste, plus a number of examples that will help you visualize the method. We’ll additionally have a look at widespread materials sizes and the way they have an effect on your calculations, ensuring you get the correct quantity to your buck.
Calculating Backsplash Materials Space
Calculating the realm of your backsplash is the inspiration for determining how a lot materials you want. As soon as you’ve got bought the measurements, you’ll be able to decide the entire space. That is vital for correct materials orders and stopping shortages. Utilizing the appropriate system is important for the perfect outcomes.
Space = Size x Width
For instance, in case your backsplash is 5 toes lengthy and three toes huge, the entire space is 15 sq. toes. This can be a elementary idea it’s essential to grasp earlier than shifting on.
Contemplating Materials Waste
Materials waste is an actual factor, folks. Irrespective of how cautious you’re, some tiles will inevitably get chipped or cracked throughout the set up course of, otherwise you may simply lower a number of further items that do not match. All the time account for this. An excellent rule of thumb is so as to add 10% to your calculated space to account for this inevitable loss.
Backsplash Materials Sizes and Their Affect
Widespread backsplash supplies come in numerous sizes. As an illustration, tiles are sometimes offered in squares or rectangles. Figuring out the scale of the fabric you are utilizing is important. The larger the tile, the less you will want, however the extra complicated the cuts could be. Understanding these sizes will provide help to estimate the quantity of fabric you want extra precisely.
- Ceramic Tiles: Sometimes are available 4×4, 6×6, 8×8, and 12×12 inch sizes. Bigger tiles cut back the variety of items wanted, however can require extra exact chopping, which ends up in extra waste.
- Glass Tiles: Just like ceramic tiles by way of dimension choices, however can have completely different thickness that impacts how they’re dealt with and put in.
- Stone Slabs: Typically measured in bigger slabs, like 2×4 toes, and even bigger. This can have an effect on how you intend the format and the quantity of waste to anticipate.
Materials Price-Effectiveness Comparability
Completely different backsplash supplies have completely different worth factors. Components like the fabric’s high quality, sturdiness, and design options have an effect on the value. Doing a little analysis on prices will provide help to make an knowledgeable choice about what’s greatest to your finances and design. Ceramic tiles are sometimes a mid-range possibility by way of worth and sturdiness, whereas pure stone like marble or granite could be considerably costlier but in addition extra luxurious.
Figuring out your finances beforehand helps in making the only option to your undertaking.
Examples of Figuring out Materials Wants
As an instance you are putting in a 6×6 inch ceramic tile backsplash over an space of 10 sq. toes. A ten% waste issue will deliver the wanted materials to 11 sq. toes.
| Backsplash Design | Materials Measurement | Space Wanted (sq ft) | Waste Issue (10%) | Whole Materials Wanted (sq ft) |
|---|---|---|---|---|
| Easy subway tile | 4×8 inch | 12 | 1.2 | 13.2 |
| Mosaic sample | 1×1 inch | 20 | 2 | 22 |
These examples exhibit the best way to calculate materials wants for varied backsplash designs. Keep in mind, all the time account for waste and materials sizes to make sure you have sufficient to your undertaking.
Visualizing Backsplash Design Choices
Yo, fam! Selecting a backsplash is extra than simply choosing a fairly tile. It is about making a vibe that completely matches your kitchen’s aesthetic and makes it your personal private paradise. We’re diving into design choices, shade schemes, and the way completely different layouts can completely remodel your house. Get able to unleash your inside inside designer!Visible attraction is essential when deciding on a backsplash.
Completely different layouts and shade selections can dramatically alter the general really feel of your kitchen. Consider it like including a contemporary coat of paint to a room – it completely modifications the temper and the way in which all the things appears. A well-chosen backsplash can spotlight your kitchen’s strengths, and even make a small house really feel larger and extra open.
Completely different Backsplash Layouts
Completely different backsplash layouts can dramatically change the visible influence of your kitchen. A easy, straight format may give a clear, trendy really feel, whereas a extra elaborate sample can add a contact of sophistication or perhaps a playful vibe. The format you select will influence the general aesthetic of the kitchen. For instance, a herringbone sample can create a extra conventional or traditional look.
- Straight Format: A traditional alternative, straight layouts are simple to put in and create a clear, trendy look. They’re good for kitchens with a minimalist aesthetic or when you’re aiming for a smooth, up to date vibe. Assume clear traces and a streamlined design.
- Diagonal Format: Diagonal layouts add a contact of sophistication and visible curiosity. They’ll create an phantasm of depth and house, particularly in smaller kitchens. The angled traces could make a press release and add a dynamic ingredient to the room.
- Herringbone Format: A conventional and chic alternative, herringbone patterns are good for kitchens with a traditional or classic design. The interlocking sample creates a textured look that provides visible depth and character.
- Geometric Sample: Geometric patterns can vary from easy to complicated, providing limitless prospects for personalisation. They’re glorious for kitchens with a daring or up to date design. Think about the scale of your kitchen and the general sample complexity to realize the appropriate steadiness.
Affect of Backsplash Colour Selections
Colour choice is essential in creating the appropriate ambiance to your kitchen. Mild colours could make a room really feel bigger and brighter, whereas darker colours can add depth and class. The proper shade palette can spotlight the pure gentle in your house or create a comfortable ambiance. Think about the general shade scheme of your kitchen when making your alternative.
- Mild Colours: Mild colours like cream, beige, or white could make your kitchen really feel brighter and extra spacious, particularly you probably have restricted pure gentle. They’re versatile and might work with quite a lot of kitchen kinds.
- Darkish Colours: Darkish colours like navy blue, deep greens, or grays can create a dramatic and complicated look. They’ll add a contact of magnificence and might work properly in kitchens with loads of pure gentle.
- Impartial Colours: Impartial colours like grey, beige, or taupe are versatile and might complement any kitchen model. They create a chilled and balanced surroundings, good for individuals who desire a impartial backdrop.
Backsplash Materials and Colour Combos
This is a glimpse at some eye-catching backsplash materials and shade combos:
| Materials | Colour | Visible Enchantment |
|---|---|---|
| Ceramic Tile | White/Cream | Clear, traditional, and shiny |
| Glass Tile | Deep Teal | Refined, trendy, and distinctive |
| Stone | Grey/Beige | Pure, elegant, and timeless |
| Steel | Copper/Bronze | Trendy, stylish, and heat |
Backsplash Design Concepts Primarily based on Kitchen Fashion
Your backsplash ought to complement your kitchen’s total model. Think about the design components and the general theme of your kitchen when deciding on a backsplash. Listed here are some examples:
| Kitchen Fashion | Design Concept |
|---|---|
| Trendy | Glossy, minimalist backsplash with a straight format in a light-weight grey tone |
| Conventional | Traditional herringbone sample with a impartial shade palette like beige or cream |
| Rustic | Stone or wood-look tile with a pure shade scheme in a diagonal format |
| Modern | Geometric sample with daring colours and a diagonal format |
Dealing with Complicated Kitchen Layouts
Yo, homies! Tackling a kitchen with a bunch of islands and bizarre angles can really feel like navigating a maze. However concern not, fam! This information will break down the best way to measure these complicated layouts like a professional. We’ll cowl all the things from a number of islands to alcoves and loopy wall configurations. Get able to stage up your backsplash recreation!Measuring backsplashes in kitchens with a whole lot of shifting elements requires a strategic strategy.
Completely different shapes and areas demand completely different measuring methods. Understanding these nuances is essential to avoiding expensive errors and guaranteeing a seamless backsplash set up.
Measuring Backsplashes in Kitchens with A number of Islands or Peninsulas
Island and peninsula kitchens add an entire new layer of complexity. You gotta measure every part of the backsplash individually. Do not simply take one large measurement! Begin by measuring the size of every wall part that wants a backsplash. Then, add up all of the measurements to get the entire space. If there are curved sections, use a versatile measuring tape or a string technique to get correct lengths.
Keep in mind to account for any overlapping sections, too.
Measuring Backsplashes in Kitchens with Alcoves or Niches
Alcoves and niches are like little hidden gems in your kitchen. To measure them, deal with every alcove or area of interest as a separate entity. First, fastidiously measure the depth and width of the alcove/area of interest, together with any curves. Then, calculate the realm of the backsplash wanted for every part. Do not forget to account for the curved elements, otherwise you’ll find yourself with a wonky backsplash!
Measuring Backsplashes in Kitchens with Completely different Wall Configurations
Kitchens aren’t all the time symmetrical. You might need angled partitions, or perhaps a bit that curves. To measure in these conditions, deal with every distinctive part of the wall as its personal measurement. For angled partitions, use a protractor or a particular angle measuring device. And for curved sections, use a versatile measuring tape or string technique.
Keep in mind to be further exact, as a result of a small error can throw off the entire undertaking.
Visible Examples of Backsplashes in Kitchens with Complicated Layouts
Think about a kitchen with a big island, a peninsula, and an alcove. You’d have to measure the backsplash round every part individually. One instance exhibits a surprising backsplash that seamlessly integrates with the curved partitions of the alcove. One other showcases a kitchen with a number of islands, the place the backsplash design mirrors the format’s asymmetry. The visible examples illustrate how cautious measurements are essential to reaching a cohesive and aesthetically pleasing backsplash design in a posh format.
Accounting for Architectural Options When Measuring
Architectural options like beams, columns, or built-in home equipment have an effect on the backsplash’s design. Fastidiously be aware the size of those options, and ensure your measurements incorporate them. A small oversight can result in a noticeable hole or a lower that does not match the design.
Desk Outlining Challenges and Options for Measuring Complicated Layouts
| Problem | Resolution |
|---|---|
| A number of islands/peninsulas | Measure every part individually, then add up the entire space. |
| Alcoves/niches | Deal with every alcove/area of interest as a separate measurement, contemplating curves. |
| Angled/curved partitions | Use protractors, versatile measuring tapes, or string strategies for correct measurements. |
| Architectural options | Embody measurements of beams, columns, home equipment, and different particulars. |
| Overlapping sections | Precisely account for any overlapping areas to keep away from errors. |
Backsplash Measurement and Tile Format
Yo, fam! So you’ve got bought your backsplash measurements locked down, now it is time to deliver all of it along with a killer tile format. This ain’t nearly slapping tiles on the wall; it is about making a design that is contemporary, useful, and completely you. We’re gonna break down the best way to switch these measurements, account for grout, decrease waste, and create a sick tile format plan.
Transferring Measurements to a Tile Format
To begin, you gotta get your measurements onto a tile format. This could possibly be an enormous piece of paper, a digital drawing program, and even graph paper. Transferring your dimensions precisely is essential. Sketch out the backsplash space, marking the precise dimensions of the wall house, any cutouts or odd shapes, and the specified top. That is your blueprint for the entire tile undertaking.
Accounting for Grout Strains in Tile Format
Grout traces are important for an expert look, however in addition they influence the quantity of tile you want. All the time issue within the grout traces when calculating tile portions. Consider it like including a bit buffer house between every tile. In case your tiles are 4 inches sq., and also you desire a 1/4-inch grout line, your precise tile dimension, when put in, might be barely bigger than 4 inches.
Minimizing Materials Waste When Arranging Tiles
Waste is the enemy of a budget-conscious backsplash undertaking. You need to use each single tile, so plan strategically. Search for methods to make use of entire tiles. Think about using the biggest tiles potential for the house, and keep away from layouts that create plenty of small, unusable tile items. Possibly a easy, repeating sample will do the trick.
Making a Detailed Tile Format Plan
Your tile format plan is your roadmap to success. It must be detailed sufficient to visualise the entire undertaking. First, draw the format of the backsplash space. Subsequent, mark the place of each tile, together with any cuts or changes for irregular areas. Embody the kind of tile, the colour, and any particular markings for particular areas, like the sting of a countertop.
Label all the things clearly, and do not be afraid to make use of colours or symbols to make it even simpler to grasp.
Tile Format Patterns and Their Affect
| Sample | Description | Visible Affect |
|---|---|---|
| Working Bond | Tiles laid in a straight line, one row over the opposite | Easy, traditional, and visually simple |
| Herringbone | Tiles laid in a V-shape sample | Provides visible curiosity and a extra refined look |
| Basketweave | Tiles laid in an interweaving sample | Creates a textured, intricate look, with extra visible depth |
| Staggered | Tiles positioned offset from one another | A dynamic look that may create a way of motion |
Calculating Tiles Wanted Primarily based on Format, The way to measure for backsplash
As soon as your format is finalized, it’s essential to calculate what number of tiles you will want. Utilizing the size out of your format and the scale of your tiles, you’ll be able to calculate the entire space that must be lined. Then, calculate the realm every tile covers, and divide the entire space by the realm of every tile. Do not forget so as to add a buffer for cuts and waste.
For instance, when you want 10 sq. toes of tiles, and every tile covers 1 sq. foot, you will want 10 tiles. However, all the time spherical as much as the closest entire tile to keep away from shortages.
Wrap-Up
In conclusion, measuring to your backsplash is a course of that requires cautious consideration to element. By following the steps Artikeld on this information, you’ll be able to confidently measure your backsplash, precisely decide materials wants, and visualize varied design choices. Keep in mind, exact measurements are key to a profitable and delightful backsplash set up. This complete information supplies the information and instruments to realize the proper backsplash in your kitchen.
FAQ: How To Measure For Backsplash
What if my partitions aren’t completely straight?
Do not panic! Use a stage to make sure correct measurements. If there are important curves or angles, measure a number of factors alongside the wall and common the outcomes for a extra exact measurement.
How do I account for grout traces when calculating materials?
Add a small allowance to your measurements to account for the width of the grout traces. This can guarantee you’ve gotten sufficient materials to cowl the complete space, together with the grout areas.
What if my kitchen has an island?
Deal with every part of the backsplash as a separate measurement. Measure the peak and width of every part, and calculate the entire space accordingly.
What instruments do I have to measure?
A measuring tape, pencil, stage, calculator, and a digital digital camera are crucial instruments. For extra complicated layouts, a ruler and a set sq. could be needed. You should definitely select the suitable instruments to your particular undertaking.
