
Eradicating the quilt on a Ring doorbell is an easy course of that may be accomplished in a couple of minutes. It could be essential to take away the quilt to exchange the batteries, troubleshoot issues, or clear the system. Listed here are the steps on how you can take away the quilt on a Ring doorbell:
1. Unscrew the safety screw. There’s a single safety screw positioned on the backside of the Ring doorbell. Use a Phillips screwdriver to unscrew it.
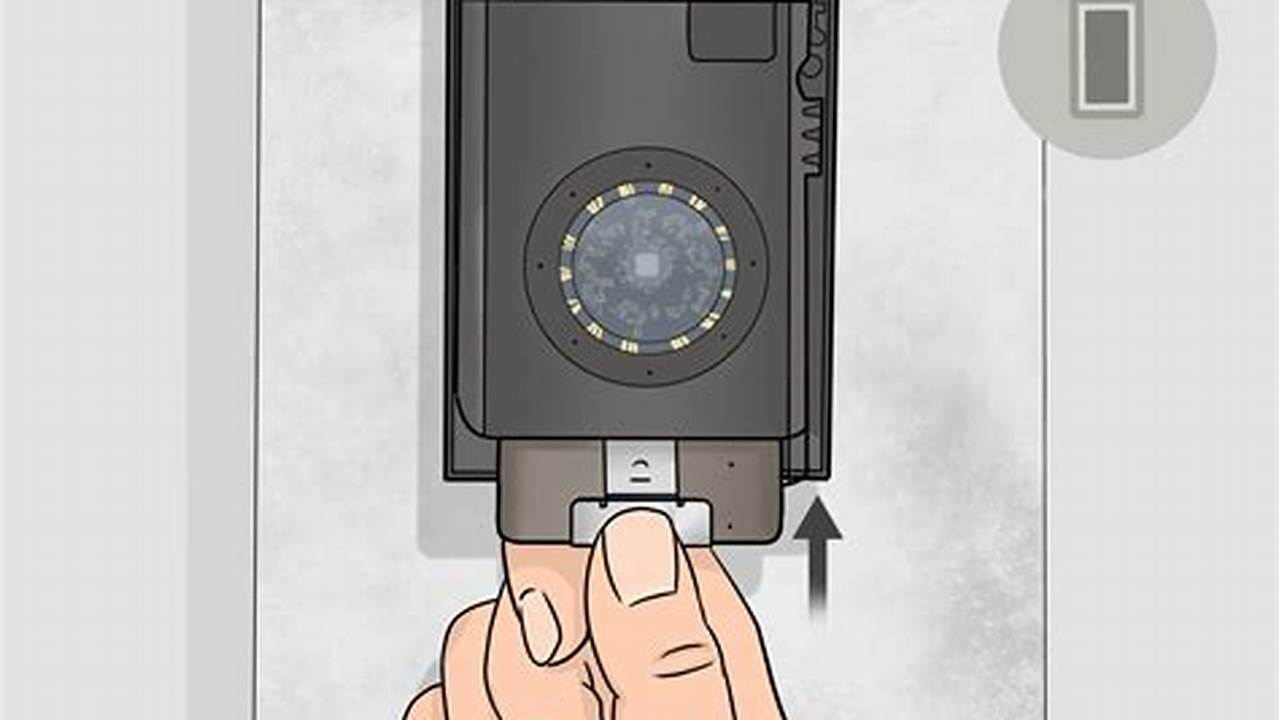
2. Pull the underside of the quilt away from the doorbell. As soon as the safety screw is eliminated, you may pull the underside of the quilt away from the doorbell. The duvet is held in place by magnets, so it ought to come off simply.
3. Carry the quilt up and off of the doorbell. As soon as the underside of the quilt is pulled away from the doorbell, you may raise the quilt up and off of the system.
1. Safety screw
The safety screw is a crucial part of the Ring doorbell’s design. It helps to maintain the quilt securely in place, stopping unauthorized entry to the system’s inner parts. Eradicating the safety screw is step one in eradicating the quilt, which can be vital for a wide range of causes, comparable to changing the batteries, troubleshooting issues, or cleansing the system.
- Operate: The safety screw’s main perform is to safe the quilt to the doorbell, stopping it from being simply eliminated. This helps to guard the system from theft and tampering.
- Location: The safety screw is usually positioned on the backside of the Ring doorbell, making it simple to entry with a screwdriver.
- Removing: To take away the safety screw, merely use a Phillips screwdriver to show it counterclockwise. Watch out to not overtighten the screw, as this may harm the doorbell.
By understanding the aim and performance of the safety screw, you may safely and simply take away the quilt in your Ring doorbell when vital.
2. Backside of the quilt
The step “Backside of the quilt: As soon as the safety screw is eliminated, you may pull the underside of the quilt away from the doorbell” is a vital step within the means of “The best way to Take away Cowl on Ring Doorbell”. Eradicating the safety screw means that you can entry the quilt of the doorbell, which can be vital for a wide range of causes, comparable to changing the batteries, troubleshooting issues, or cleansing the system.
The underside of the quilt is designed to be simply eliminated as soon as the safety screw is unscrewed. It’s because the quilt is held in place by magnets, somewhat than by screws or different fasteners. To take away the quilt, merely grasp the underside of the quilt and pull it away from the doorbell. The duvet ought to come off simply, revealing the inner parts of the doorbell.
Understanding the significance of this step and the way it suits into the general means of eradicating the quilt on a Ring doorbell is crucial for anybody who must carry out this activity. By following the steps within the appropriate order and utilizing the right method, you may safely and simply take away the quilt in your Ring doorbell.
3. Magnets
Using magnets to carry the quilt in place is a key part of “The best way to Take away Cowl on Ring Doorbell”. Magnets present a easy and efficient approach to safe the quilt with out the necessity for screws or different fasteners, making it simple to take away when vital. This design characteristic is especially essential for gadgets just like the Ring doorbell, which can must be accessed ceaselessly for upkeep or troubleshooting.
The magnets used within the Ring doorbell cowl are robust sufficient to carry the quilt securely in place, even when the doorbell is mounted on a vertical floor. Nevertheless, they’re additionally weak sufficient to permit the quilt to be eliminated simply by hand. This steadiness between energy and ease of removing is crucial for the right functioning of the doorbell.
Understanding the position of magnets within the Ring doorbell cowl is essential for anybody who must take away the quilt for any motive. By understanding that the quilt is held in place by magnets, you may keep away from utilizing extreme power or instruments that would harm the doorbell. Merely greedy the underside of the quilt and pulling it away from the doorbell ought to help you take away it simply.
4. Carry the quilt
The step “Carry the quilt: As soon as the underside of the quilt is pulled away from the doorbell, you may raise the quilt up and off of the system.” is a vital step within the means of “The best way to Take away Cowl on Ring Doorbell”. Eradicating the quilt of the Ring doorbell could also be vital for a wide range of causes, comparable to changing the batteries, troubleshooting issues, or cleansing the system. Understanding the significance of this step and the way it suits into the general means of eradicating the quilt on a Ring doorbell is crucial for anybody who must carry out this activity.
As soon as the safety screw is eliminated and the underside of the quilt is pulled away from the doorbell, the ultimate step is to raise the quilt up and off of the system. This step is essential as a result of it means that you can entry the inner parts of the doorbell, such because the battery and the wiring. By following the steps within the appropriate order and utilizing the right method, you may safely and simply take away the quilt in your Ring doorbell.
In abstract, the step “Carry the quilt: As soon as the underside of the quilt is pulled away from the doorbell, you may raise the quilt up and off of the system.” is a crucial a part of the method of eradicating the quilt on a Ring doorbell. By understanding the significance of this step and following the right process, you may safely and simply take away the quilt to entry the inner parts of the doorbell.
5. Security
When eradicating the quilt on a Ring doorbell, it is very important watch out to not harm the wires or different parts. Damaging these parts can stop the doorbell from working correctly, and will even void the guarantee. Listed here are some tricks to keep away from damaging the wires or different parts when eradicating the quilt:
- Use the right instruments. The easiest way to keep away from damaging the wires or different parts is to make use of the right instruments. A Phillips screwdriver is required to take away the safety screw on the backside of the doorbell. Don’t use a flathead screwdriver or different device that would harm the screw or the doorbell.
- Be light. When eradicating the quilt, be light and keep away from pulling or tugging on the wires. The wires are delicate and will be simply broken if an excessive amount of power is utilized.
- Examine the wires earlier than reattaching the quilt. As soon as the quilt is eliminated, examine the wires to verify they don’t seem to be broken. If any wires are broken, they may must be repaired earlier than the quilt will be reattached.
By following the following pointers, you may safely take away the quilt in your Ring doorbell with out damaging the wires or different parts.
FAQs about “The best way to Take away Cowl on Ring Doorbell”
This part supplies solutions to ceaselessly requested questions on eradicating the quilt on a Ring doorbell. Understanding these solutions may help you safely and successfully take away the quilt for upkeep or troubleshooting functions.
Query 1: Why is it essential to take away the quilt on a Ring doorbell?
Reply: Eradicating the quilt on a Ring doorbell could also be vital for numerous causes, comparable to changing the batteries, troubleshooting issues, cleansing the system, or accessing the inner parts.
Query 2: What instruments are required to take away the quilt on a Ring doorbell?
Reply: A Phillips screwdriver is the one device required to take away the quilt on a Ring doorbell.
Query 3: How can I keep away from damaging the wires or different parts when eradicating the quilt?
Reply: To keep away from damaging the wires or different parts, use the right instruments, be light when eradicating the quilt, and examine the wires earlier than reattaching the quilt.
Query 4: What ought to I do if I encounter any difficulties or harm the doorbell whereas eradicating the quilt?
Reply: When you encounter any difficulties or harm the doorbell whereas eradicating the quilt, contact Ring assist or a professional electrician for help.
Query 5: How usually ought to I take away the quilt on my Ring doorbell for upkeep?
Reply: The frequency of eradicating the quilt for upkeep is dependent upon the utilization and surroundings. It’s usually really useful to take away the quilt each few months to scrub the system and examine for any free connections.
Query 6: Can I take away the quilt on a Ring doorbell with out unscrewing the safety screw?
Reply: No, eradicating the safety screw is a vital step to take away the quilt on a Ring doorbell.
Abstract: Understanding the right steps and precautions for eradicating the quilt on a Ring doorbell is crucial for sustaining the system and making certain its optimum efficiency. By following the rules outlined on this FAQ part, you may safely and successfully take away the quilt for numerous functions.
Transition to the subsequent article part: Now that you’ve a transparent understanding of how you can take away the quilt on a Ring doorbell, let’s discover the method of troubleshooting frequent points with the system.
Tips about Eradicating the Cowl on a Ring Doorbell
Eradicating the quilt on a Ring doorbell is an easy course of, however there are a number of ideas that may make it simpler and safer. Listed here are 5 ideas to remember:
Tip 1: Use the right screwdriver. A Phillips screwdriver is required to take away the safety screw on the backside of the doorbell. Don’t use a flathead screwdriver or different device, as this might harm the screw or the doorbell.
Tip 2: Be light. When eradicating the quilt, be light and keep away from pulling or tugging on the wires. The wires are delicate and will be simply broken if an excessive amount of power is utilized.
Tip 3: Examine the wires earlier than reattaching the quilt. As soon as the quilt is eliminated, examine the wires to verify they don’t seem to be broken. If any wires are broken, they may must be repaired earlier than the quilt will be reattached.
Tip 4: Watch out to not lose the safety screw. The safety screw is a small half, and it may be simply misplaced if you’re not cautious. You should definitely maintain monitor of the screw as a way to reattach the quilt when you’re completed.
Tip 5: When you encounter any difficulties, contact Ring assist. When you encounter any difficulties eradicating the quilt in your Ring doorbell, don’t hesitate to contact Ring assist. They are going to be in a position that can assist you troubleshoot the issue and get your doorbell working correctly once more.
Abstract: By following the following pointers, you may safely and simply take away the quilt in your Ring doorbell. Bear in mind to be light, use the right instruments, and examine the wires earlier than reattaching the quilt.
Transition to the article’s conclusion: Now that you know the way to take away the quilt in your Ring doorbell, you may simply entry the inner parts of the system for upkeep or troubleshooting functions.
Conclusion
Eradicating the quilt on a Ring doorbell is an easy course of that may be accomplished in only a few minutes. By understanding the steps concerned on this course of and by following the guidelines outlined on this article, you may safely and simply take away the quilt in your Ring doorbell for upkeep or troubleshooting functions.
When you encounter any difficulties or have any questions, don’t hesitate to contact Ring assist. They are going to be in a position that can assist you troubleshoot the issue and get your doorbell working correctly once more.
